Friday, July 27, 2012

My Lost Layout.........

A bit of funny background on this layout lol. A few weeks ago I posted this on Facebook:
I am losing it. I was going through all of my stuff looking for this craft project that I know I did. I am convinced it has to be here freaking somewhere. 
I take pictures of all my little crafties. So, I go looking through the pictures, and it is not there. Turns out it is just one of those things that I have been meaning to do but never actually got around to doing. Seriously? I wasted like 45 minutes looking for that damn thing lol.
Isn't that hilarious? I just knew it was here somewhere. Turns out I created it all in my head lol.
Anyway, this is a layout I did this week (finally!) about our camping trip for the muzzleloader deer hunt in 2010. Our good friends next door, the Carter's, came with us for the first time. And my nephew, Ryan, spent the week up there with us too. His mom (my sister Lacy), dad, and sister (Jordyn) came up over the weekend. We had a blast and hope to continue the tradition every year. Like a reunion of sorts.
That picture of Garrett (top right above) is really dark. So I have a new one coming in my next print batch. It will bug me to no end if I don't replace it lol.

Sunday, July 22, 2012

My Craft Room Storage Mini Makeover

Just so you know, this post is going to be long lol. I don't mind if you skip through to the pictures. But some people like to read the evolution of how a scrap room happens. I know I do just to get ideas for my own. So, consider yourselves warned lol.
I have always been one of those people that look at those craft rooms online--I know you know the ones I am talking about--and just drool over other people's space and wish I had something like that.
Well, I decided a few weeks ago that while I still share office space with my hubby--which won't change until the boy hopefully graduates college (he is 15, so yeah a while)--and I can't make the changes that I would really love because he would really hate them, I can make some changes that we can both agree on (or live with in his case :).
First I went through all of my things and got rid of a lot that I don't use and is taking up space. I hate things being stacked on the floor and all the clutter going on. My sister and I had a big yard sale this past weekend with all of mine and her crap (ahem, I mean good usable stuff lol).
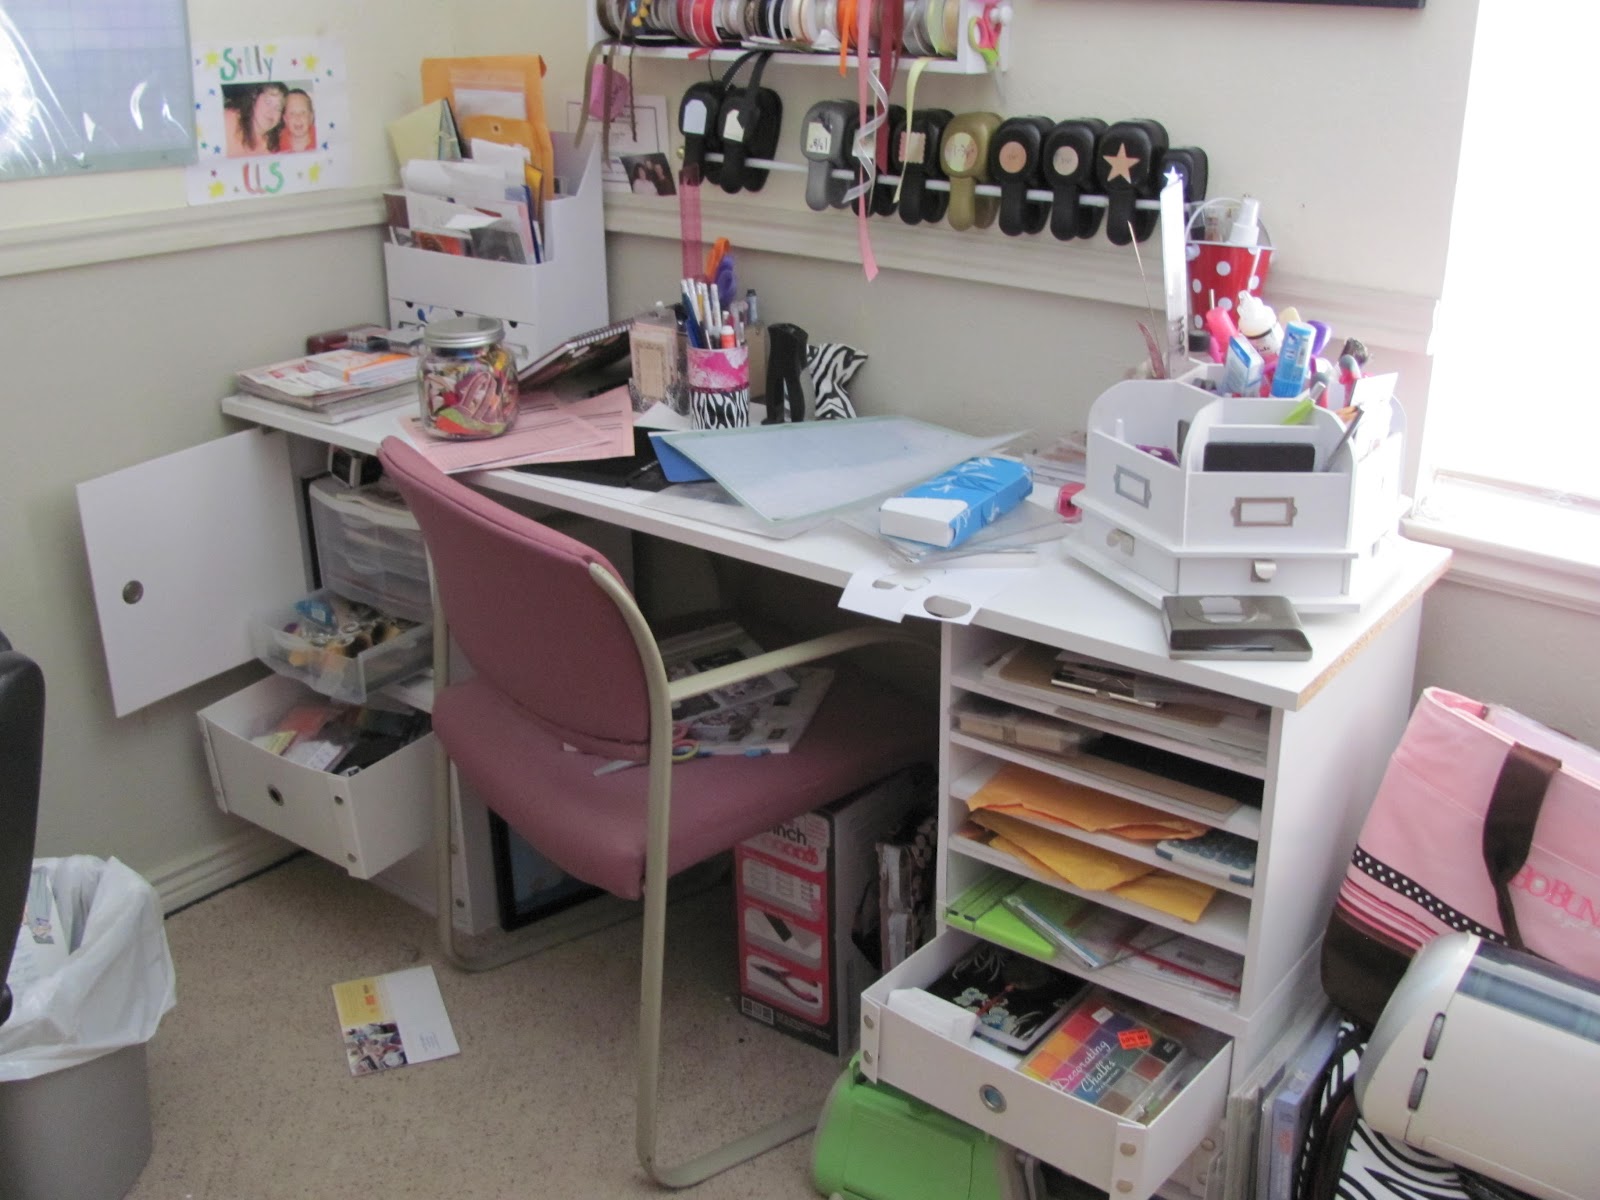
I like the look of black and white, which is really no surprise because I love me some zebra print. And Shane already helped me build a white craft desk a long time ago when I bought some modular pieces while working at Roberts. I also bought some white tool caddies and desktop storage to match.
I still have this same desk and it still work well for me. I think you can buy similar pieces at Hobby Lobby and Michael's. The top piece was a melamine piece that I got at Home Depot and just had them cut to size (as you can see from the exposed end on the right. I bought melamine to cover it but never got around to it).
You can also see in the above photo my most used punches hanging on the cafe rod. LOVE that. Makes them very accessible.
Above is my storage system for my other punches. I really can't think of anything better for these in such a small space. This is functional and you can see them all. Although I have added more now and I think I will need another shoe hanger on the back side of one of the doors. It's really an addiction problem.
And here you can see my black magnet board and Making Memories white storage shelf that were also bought back when Roberts was still around and I worked there.
So, anyway, a few weeks ago I decided to look for storage solutions in the black/white color scheme. I concentrated on the black mostly because that was what Shane and I could agree on. Then I added zebra print as an accent. But I plan on bringing in a few butterflies and damask here and there as well. I think as long as I keep it black and white, it will still be pretty. And Shane agreed that it was fine as long as it was an accent and nothing was too permanent (like paint).
I did a search on Ebay for CD storage because my stamps have been unmounted and are stored in CD cases. I had them in a CD tower, but I didn't really like it because it was on the floor and got kicked or tipped over a lot. Plus the grooves that you use to slide them in didn't seem to be wide enough for my CD cases. They always fell off the tracks and looked messy.

I found these super cute Snap N Store boxes at Bescsuel Solutions store on Ebay. They have really great prices. The shipping was more than I wanted to pay, but they were exactly what I was looking for. I also purchased very similar boxes to store my handmade cards, my pictures waiting to be scrapped, and my flower embellishments. I don't have before pictures for most of that. But it was all pretty much in rubbermaid totes like you find at Walmart. They were big and ugly and all with different colored lids. It did the job at the time, but now I have what I want.
I have wanted to change my paper storage for a while. Mostly for cardstock. Because I have it stored vertically, and it gets bent or warped a lot. I think if it lies flat, it will be easier to keep it nicely. I went to Hobby Lobby just to look around and was pleasantly surprised to find that all of the Paper Studios storage was on sale. And, they had them in both plain black and in zebra print--joy! I bought two zebra and three black then switched the lids on some to change it up a bit. I love love love them. I left the patterned paper in my Cropper Hopper vertical files because it is beneficial for me to be able to see it. And it is in plastic dividers so it doesn't really get too much damage unless I handle it a lot. I have my paper divided by manufacturer because I was a scrapbook buyer. So I know the general style a certain scrapbook vendor has and it makes it easier for me to find what I'm looking for. But, a lot of people find it easier to divide by color or theme.
The system I had for my paper scraps before worked just fine. In fact, it was the best system I  had in place lol. But it wasn't cute. So, I just updated it. Before it was in Sterlite file boxes with blue lids and those ugly green hanging file folders. I sold the Sterlite totes in a yard sale and used the money to buy one inexpensive black file crate. I then purchased a couple of rolls of zebra duct tape and used it to decorate the file folders. Now it is functional and pretty!
I have this idea binder in my craft room with card and scrapbook page sketches, color combo ideas, and other random things to spark my creativity. It was in a pretty blue binder with flourishes and butterflies. But I bought a cheap black one and decorated it to match my new theme.
A few months ago I bought this modular storage system from Walmart. Now they have black ones. But I guess the white are ok too ;) This makes it so much easier for me to find and put my things away, you have no idea!
This year I started saving my coupons from Archiver's and Hobby Lobby and slowly changing out all of my post bound and multi-color binders for genuine leather black albums with metal tag accents. I love them. And when I need to add a page in the middle, it isn't a pain at all anymore.
Sorry for the low quality pic. I just took it inside the house at night with a cell phone inside a closet. So, you know :(
Last, but not least lol. I have had this bag forever. But it is my fave! And probably the biggest inspiration for my craft room. The inside is hot pink. It is so cute. Too bad I don't go to crops much lol. But it serves as storage for all of my extra page protectors and the cute binders that don't match my theme and I couldn't let go of just yet lol.
And, just for fun, this is how my craft closet used to look. Eeeesh.........see all of hte mismatched plastic storage containers stacked on top of one another mixed with boxes and bags and everything spilling out? I hope you can see the improvement anyway.
Thanks for visiting and reading my huge long post. Hope you made it. Til next time...........

Saturday, July 21, 2012

A Box for Cards

So, I've been showing you some cards this week that I have been planning on giving as a Christmas gift to some lucky family member. I needed something to put them in, so I went looking for handmade boxes on the internet. Holy moly--lots of stuff to see in that search. A girl could get distracted, and this one did lol! There are so many cute boxes you can make out of just paper and some creative scoring/cutting. Wow.
Anywho, I settled on trying this little beauty out. It seemed pretty simple and easy to follow the instructions the lady gave. And, it really was. Until I got to cutting out some patterned paper to decorate the box with. Wow. Not so easy. You'd think you could just follow the same measurements then cut it down a bit, right? Hmmm......not so. At least not for me. So some of my cut lines on the patterned paper are a little wonky. But that is part of the charm on a handmade gift, right? Whatev--it is still pretty cute no?


I made the little flower closure out of scrap paper and my scallop punches from Stampin Up! The brad is one I got as a sample when I worked for Roberts. Haven't the faintest what vendor it came from (sorry). All of the patterned paper is My Minds Eye. The kraft cardstock is no name from Roberts as well. Hope I can find some more like that when I run out. It is my favorite!

Friday, July 20, 2012

Some Masculine Cards

If you are anything like me (and if you're a cardmaker lol), you probably struggle with the manly-type cards, right? It is so hard for me to make a man card sometimes. I have my standard go-to deer stamp or maybe an old truck stamp. But you can only use those so many times on the same person, right?
So, I looked around on a bunch of sites like Pinterest and Splitcoast Stampers and found some layouts that were pretty simple and could be used with pretty much any papers--no butterflies or flowers see?
Then I just used more masculine colored paper than I would normally use, and voila, a masculine card! Plus, I got to use up some of my paper scraps. Win-win.

 Super Simple--but men prefer it that way, right?
This sky is way easy. Just take a punched paper scallop edge circle and use a sponge with blue ink on it to dab ink around the edges. Seriously easier than it looks. There is a tutorial in this post.
And last, but not least, don't you LOVE this card? I totally copied it form this card I found on Pinterest. I just sponged blue ink on the edges working in on my background piece. Then stamped the trees from my 'Lovely as a Tree' Stampin Up set. Voila--beautimusness! In a masculine way of course ;)

I made these to go into the card box that I'm working on for a gift as well. I also found a tutorial to make the box that I was really excited to try out. I will share that in a post later this week.
Til then............

Thursday, July 19, 2012

Simple Greetings

Just wanted to share some really fun but simple cards I made a couple of days ago to go in a gift box.  This way whoever gets the box can just reach in and grab a card real quick for things that shouldn't sneak up on you--like birthdays seem to like to do.
I looked for some simple cards all over the place, so I'm not really sure where I got my inspiration for these. But, I can tell you it wasn't my own brain. I don't do that lol. I can take an idea and run with it, but I don't come up with my own to often.
Also, someone is going to ask, and I don't know what paper line that is. I know it is My Mind's Eye, but I don't know what collection. In fact, I'm pretty sure it is a mixture of at least two.

This one gets me all in an 80's mood lol--maybe late 70's? 
I don't know. But it reminds me of roller skates for some odd reason.
 Lovin me some gingham!
 This last one is my favorite because of the butterfly (of course), and the cutout.
And, the banners are pretty sweet too.
Thanks for stopping by my little slice of bloggy land. Leave me a comment and let me know what you think?

Wednesday, July 18, 2012

Clean and Simple FTL199!

I was so excited when I saw this week's Clean and Simple sketch! I knew I had to play. I know y'all know I love me some butterflies, right? So this one was really a no brainer. I pretty much followed the sketch perfectly lol.


I had a lot of fun and will probably use this layout a lot. So simple, but also very versatile. You could jazz it up a bit with some patterned paper and embellishments, or just keep it simple. Love it!

I just used some plain white cardstock--no name brand. I embossed a panel to go on the front with a polka dot embossing folder I got forever ago from Quickutz. The butterflies are punched with the Elegant Butterfly punch from Stampin Up! They are just pieces of scrap patterned paper/cardstock that I had laying around (mostly My Mind's Eye, but the blue straweberry print is is Doodlebug I believe), and the rhinestones are from Queen & Company. The birthday stamp is unknown to me--it might be stampabilities? I got it at Hobby Lobby, but I unmounted it and now I have no idea who makes it.

Hope you enjoyed my card today--if so, leave me a comment!

Tuesday, July 17, 2012

Freak Storm

Yesterday on my way home from work, the wind started blowing really bad. So bad that Shane called me on my cell to tell me to get off of the freeway and take back roads. He was afraid of top heavy vehicles tipping and causing accidents. I think the news said the gusts were upwards of 60 MPH.
I know that is nothing for people that live in tornado alley or where the hurricanes hit. But for us, it is exciting stuff lol.
It blew a lawn chair right off of our porch so fast that Shane didn't even see where it went. We looked in the neighbor's yards and everything. No idea where it got to.
And........of all things that it ruined at our house..........this is the saddest for me.......
It took me like 12 hours to make this! And it broke in 4 pieces. Gah!
It won't glue back together with hot glue--all it does is melt the styrofoam.
And craft glue can't hold it because there is nothing to keep it together while it dries.
Wahhhh!........Oh wait. I have some little wood dowels!
I broke them in 4" pieces and stuck them in the ends of each piece of the wreath.
Then I shoved them together--and it worked!

Yay. I would have taken pictures of the surgery, but I didn't think to. I was too upset lol.
It still isn't 100% sturdy, but it will do. I taped up the back too, so maybe it will last through next season. Maybe. 

Here are some other pics of the destruction. I'm not crying over the roofing--it can be replaced. And Shane can push it back in place for now.
That's my G on the far left and his friend Dustin

That isn't my tree. It is my neighbor's across the street. But man you should have heard it snap off. Scary!
Thank goodness no one I know was seriously hurt or had any real bad property damage. At least not that I know of. Crazy!

Wednesday, July 11, 2012

Three for All.......

Someone pinned this idea from Simply Simple Stamping, and I just thought it was a fun, yet really easy idea to use for a set of gift cards. You just need three card bases and three 4" X 5-1/4" pieces of patterned paper. Then you cut the patterned papers any way you want as long as you cut them all the same. Interchange the pieces of the individual "puzzles" to make fun new combinations. Really simple, quick, fun, and cute.
Here is the set that I made:

I always love all of the fun papers from My Mind's Eye, so I tend to hoard them (Shhh.....don't tell the stash police lol). But this is a great way to use them and I only have to use a small bit of each one, so I can stretch them a bit, you know? I have a ton of paper. I don't know why I can't let go of it. But I have my favorites, and MME is definitely one of them!
The oval and label punches are from Stampin Up, and the stamp is from Pebbles Inc. Isn't it adorable!? I got it at Hobby Lobby months ago and finally got ink on it for the first time today.
One of the lucky ladies in my family is going to be getting these in a gift box for Christmas (I hope they think they are lucky anway....). I figured that since everyone is always asking me if I have a card to spare, this way they will already have them. And, since times are tough and I already have the supplies, it's a personal and thoughtful gift that didn't break the bank. Win-win.
And.....there are tutorials popping up all over the place for fun card boxes using the new scoring tool from Stampin Up. I have one of those too, so you'll probably be seeing that soon.
Til next time..........

Tuesday, July 10, 2012

My New Butterfly Toys.......

I got my first order from the new Stampin Up catalog today, and just couldn't wait to use my new butterfly goodies. I know you all know how much I love butterflies lol.
I got the new Papillon Potpourri stamp set and coordinating Elegant Butterfly punch. I also used this week's FTL198 sketch over at Clean and Simple Stamping.
Again, I had to take a picture at night because I didn't finish during the daytime and really just can't wait to share. I am impatient. So, excuse the lighting. The colors are a bit off, but you get it.
Thanks for visiting my little blog today. Leave me a comment! I want to hear what you think.


Sunday, July 8, 2012

4th of July

This year the 4th of July fell on a Wednesday, which I think just really sucks. I hate when holidays fall in the middle of the week because you can't really do anything that takes much time and then when you go back to work on Thursday, it feels like Monday. Boy, and I tell you, that Thursday totally felt like a Monday. And it has lasted through the weekend. Boo on Mondays!
Anyhow, since we couldn't stay up late to watch fireworks (due to work the next day--that four letter word again), we decided to go try out the local river. We haven't ever fished it or even really gotten close to it truthfully lol. There is a really nice path that is paved and everything right next to it. I think that would be a great place to go walking. Although, I'd have to drive there first. It is like 3 miles from my house, and I am way out of shape.
Let's get back to the subject here. I ramble a lot. We drove down to the river path with our good friends and neighbors, the Carter family. The men brought their fishing gear, and me and Pam decided to take Garrett and Dustin to find a place to play in the water. It was so dang hot that day! Colin wasn't far behind. Where there is water, he will be in it lol.
We all had a really great time. The men caught fish, we all got exercise walking back and forth on the path, and plenty of swimming and water play was had. We brought Bella and Angel (the dog babies) too, and they loved it as well.
All in all, it was a really fun day. And I did get to sneak out later that night and watch a few fireworks. Shane is such a bah humbug about them that I didn't even bother waking him up to go look. But I LOVE them, and I will be going to the big show that Mapleton city puts on July 24th regardless of my work schedule. One time a year I get to see them.
Here are some pictures. I took them with my phone camera, so not really the best. But proof nonetheless lol.
That bridge leads to a path right up between two houses and into a neighborhood. I'd love to live there! And the houses were SO nice.
Proof that I was here lol. Not the most flattering pic but whatever.

Monday, July 2, 2012

Pintersty Craftspiration

Have I mentioned that I am ADDICTED to Pinterest? Well, I am lol.
I found this wreath on there a couple of months ago and TOTALLY fell in love. I've been itching to make it ever since.
I am such a sucker for anything red, white, and blue--throw in some stars and a little bling, and I am done for. So you can imagine when I saw this how I must have bee swooning right?
Anyway, I finally got the time and a few extra dollars to make one, and I have to say, I LOVE IT!
I did it a bit differently than the original blogger. She pinned her felt squares onto the wreath. I forgot to buy pins, and I really didn't feel like going back to the store, so I thought that hot glue seemed like it would work. And, I have to say, it did the job marvelously.
I didn't post the picture of it on my door because after I took it I realized how heinously dirty it is. Maybe I should be cleaning instead of crafting? Hmm......nah!

Sunday, July 1, 2012

One of Shane's Favorite Things to Do

A while ago, I think around May sometime, Shane got a screaming deal on a rotisserie attachment for his barbecue at a yard sale. It was only $3!
Shane loves to barbecue, and he has always wanted a rotisserie, so you can just imagine how excited he was.
Today he had the chance to go ahead and finally try it out. To be honest, I'm pretty surprised it took him so long.
You could see when he was setting it all up, getting all of his seasonings ready and stuff, how excited he was lol. It was like a kid at Christmas. Which is just really foreign to me because I hate cooking. It is hot and you have to clean up afterward, which is another thing I hate lol. But he says it relaxes him, so to each their own I guess.
Anyway, here is a picture of the proud chef and his tasty chicken. Really, I have to admit, probably the best chicken I've ever tasted.
Don't be hatin on the farmer tan lol. He has worked hard on that this year peeling and all.